Grown-Up Flourless Chocolate Espresso Cake
I love introducing our son to holiday traditions, but there is also something special about celebrating the season with other grown-ups. I can light nice-smelling candles without worrying about someone sticking their finger in the flame. We can eat our meals at a leisurely pace and enjoy long conversation! While being a parent is an amazing gift, there is something really freeing about intentionally arranging an evening where no one has to pack diapers or pajamas or worry about bedtime. That’s why, this year, we are making a point to have a date night or two with other couples.
 by
Amanda
by
Amanda
by
Amanda
I love introducing our son to holiday traditions, but there is also something special about celebrating the season with other grown-ups. I can light nice-smelling candles without worrying about someone sticking their finger in the flame. We can eat our meals at a leisurely pace and enjoy long conversation! While being a parent is an amazing gift, there is something really freeing about intentionally arranging an evening where no one has to pack diapers or pajamas or worry about bedtime. That’s why, this year, we are making a point to have a date night or two with other couples.
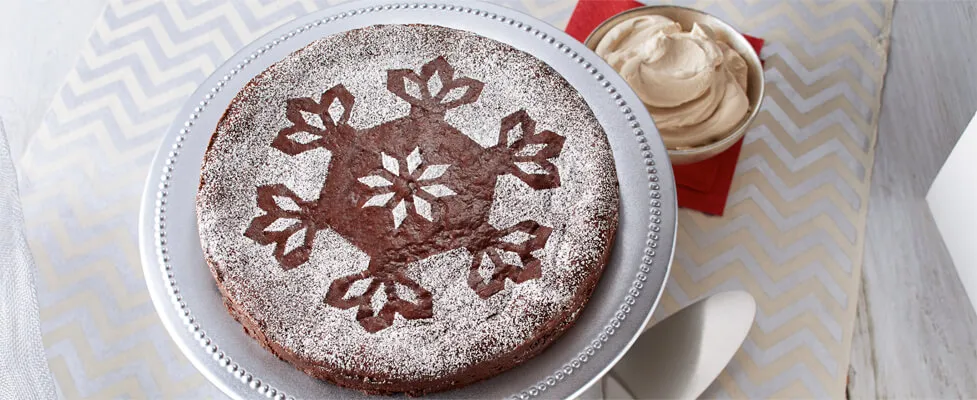
We love to entertain in our home, so preparing a meal together is both relaxing and low-budget — which helps justify the expense of a babysitter (or treating grandma to a “thank you” dinner!). And, since we have the chance to enjoy an evening with friends, it’s only fitting that we escalate the dessert a bit (you know; plan the dessert first and worry about “the rest” later). That’s what led me to this Flourless Chocolate Espresso Cake. It can be made a couple of days ahead, and even comes with a pretty snowflake stencil for decorating the top! Yes, this is the sort of grown-up Christmas treat that you’ll want your friends to savor with you.
To make Flourless Chocolate Espresso Cake, preheat your oven to 350ºF.
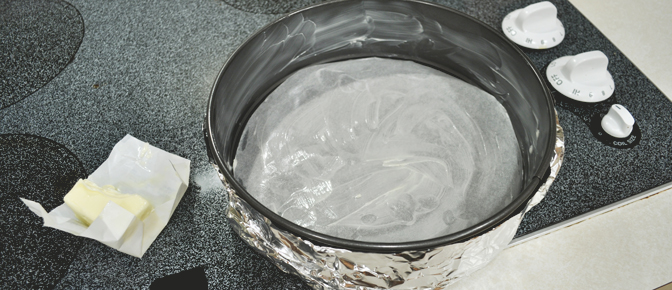
Then, prepare your pan so it’s ready for baking: start by assembling a springform pan. Set the pan on top of a sheet of parchment paper and trace around the pan. Cut out the parchment circle and set it in the bottom of the springform pan (it may require a little extra trimming). Wrap the entire outside of the pan with aluminum foil. Since this cake gets baked in a water bath, the aluminum foil is intended to help keep moisture from seeping into the batter. Use your fingers to butter the parchment paper and insides of the pan.
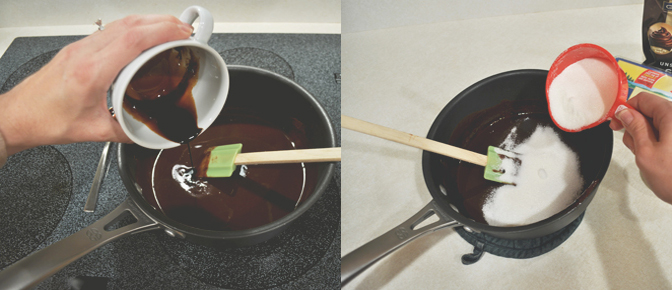
In a small cup, combine 1 tablespoon instant espresso powder with one tablespoon hot water and set aside. You’ll use that in a couple of minutes.
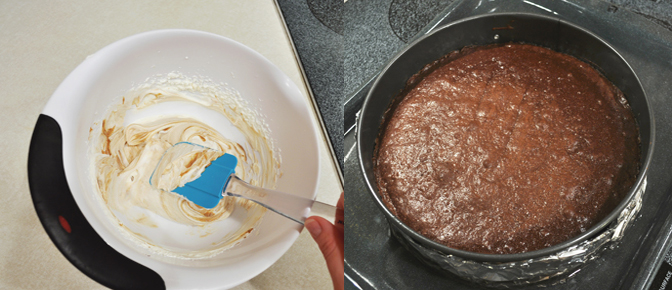
Now it’s time to mix up your cake batter. Place the unsalted butter and chocolate chunks in a 2-quart saucepan. I used four ounces of very dark chocolate and two ounces of semi-sweet chocolate for a rich mixture. Melt the butter and chocolate over medium heat, stirring frequently until completely melted.

Remove it from the heat and stir in the espresso mixture. Add the sugar and beat with a whisk until well combined.
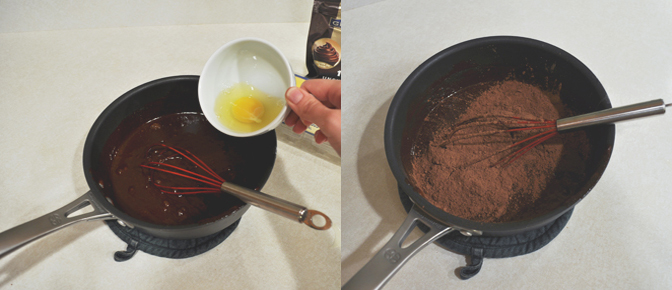
Add the eggs, one at a time, whisking after each addition. Finally, whisk in the cocoa powder.
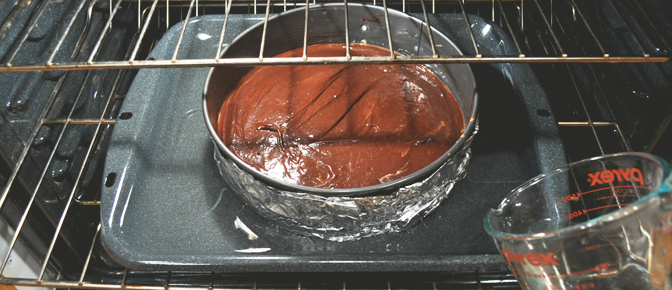
When the batter is completely mixed together, pour it into the prepared pan. Set the filled springform pan inside a large roasting pan. (This is the point at which I realized that I do not own a roasting pan, so I made do with what I could find. Note to any family members reading this post: A roasting pan would make a great gift for me!).
Carefully fill the roasting pan with hot water to a depth of about one inch up the sides of the pan. This creates a water bath for the cake to help keep it moist.
In the interest of keeping things real, I will admit that I tried filling the roasting pan straight from my tap (with the spring form pan already nestled inside). But, I was not as coordinated as I thought…and ended up pouring some water directly into my cake batter. So, I scrambled with a paper towel to soak up as much of the puddle on top of my batter as I could. Then I smoothed the top of the cake again with a spatula and put it in the oven. That’s when I switched to this method: Fill a large measuring cup with water, pour into the roasting pan, repeat. The good news is that the cake still turned out great, so if you get a tiny bit of water in there, you don’t have to freak out like I did! Bake the cake for 40-45 minutes or until the center is set.
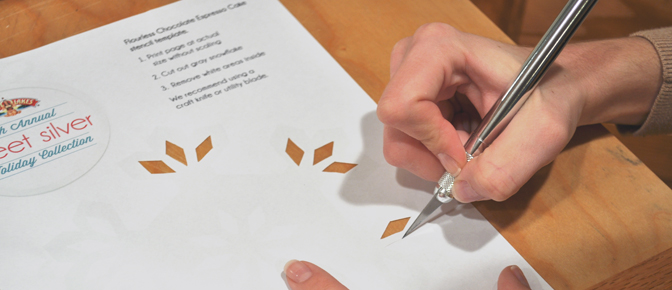
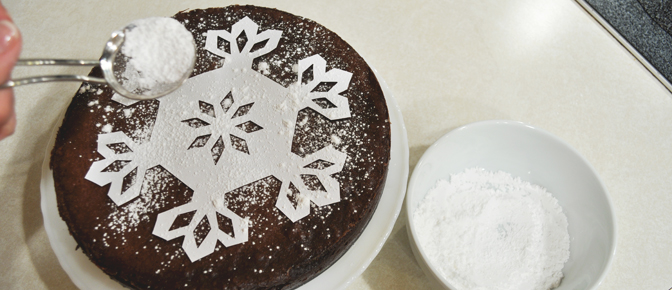
Meanwhile, you can clean up your dishes and get crafty with the powdered sugar stencil. Print the PDF at actual size (no scaling). As you can see, the print on mine was very faint. So, you may want to try printing in black and white to help boost the contrast. I just used a craft knife to cut out the white parts on my cutting board.
You can also use this time to prepare the espresso whipped cream. It is to-die-for, so don’t skip this part! Prepare the espresso like you did last time, except for this, you only need a teaspoon of each (small cup + 1 teaspoon hot water + 1 teaspoon instant espresso). Set aside. Beat chilled whipping cream and 1/4 cup sugar at high speed until stiff peaks form. Then fold in the espresso mixture. Refrigerate the whipped cream until it’s time to serve.
By now, the cake should be nearly done baking. When the center appears to be set, remove it from the oven, then take the springform pan out of the water bath. Place the springform pan on a cooling rack and remove the foil. Allow the cake to cool completely.
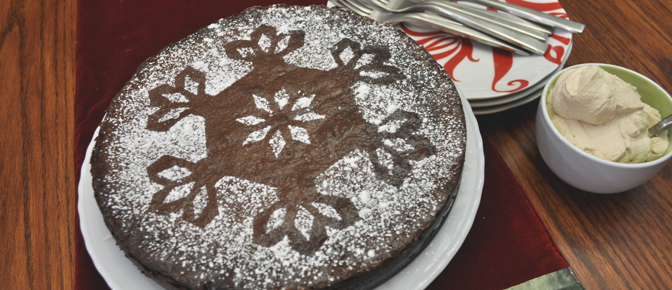
When the cake is completely cool and you’re ready to serve it, remove the sides of the springform pan. Place the cake onto a serving plate (I used this as an opportunity to showcase my grandmother’s milk glass cake pedestal!). Place the snowflake stencil on top of the cake. Lightly sprinkle a mixture of powdered sugar and edible glitter over top. When you have a nice dusting of sugars, carefully remove the stencil from the cake (I slid a knife under the edge of the stencil to help lift it without smudging my fingers in the sugar).
Finally, serve your wintery masterpiece with a side of espresso whipped cream. This decadent cake is sure to wow – with both its beautiful presentation and its rich chocolate-espresso flavoring!
Prepare this Flourless Chocolate Espresso Cake for your next holiday gathering, then rate and review the recipe.
Amanda is paid to write for the Recipe Buzz® Blog.
Share Your Thoughts
Did you find this article helpful? Has it inspired you? What else would you like to know?